
The Lucene Search EngineAdding search to your applicationsby Thomas Paul The Lucene search engine is an open source, Jakarta project used to build and search indexes. Lucene can index any text-based information you like and then find it later based on various search criteria. Although Lucene only works with text, there are other add-ons to Lucene that allow you to index Word documents, PDF files, XML, or HTML pages. Lucene has a very flexible and powerful search capability that uses fuzzy logic to locate indexed items. Lucene is not overly complex. It provides a basic framework that you can use to build full-featured search into your web sites. The easiest way to learn Lucene is to look at an example of using it. Let's pretend that we are writing an application for our university's Physics department. The professors have been writing articles and storing them online and we would like to make the articles searchable. (To make the example simple, we will assume that the articles are stored in text format.) Although we could use google, we would like to make the articles searchable by various criteria such as who wrote the article, what branch of physics the article deals with, etc. Google could index the articles but we wouldn't be able to show results based on questions such as, "show me all the articles by Professor Henry that deal with relativity and have superstring in their title." What's inside?Let's take a look at the key classes that we will use to build a search engine.
Indexing a DocumentThe first step is to install Lucene. This is extremely simple. Download the zip or tar file from the Jakarta binaries download page and extract the lucene-1.3- final.jar. Place this file in your classpath or in the lib directory of your web application. Lucene is now installed. We will assume that you have written a program that the professors can use to upload their articles. The program might include a place for them to enter their name, a title for the article, and select from a list of categories that describe the article. We will also assume that this program stores the article in a place that is accessible from the web. To index this article we will need the article itself, the name of the author, the date it was written, the topic of the article, the title of the article, and the URL where the file is located. With that information we can build a program that can properly index the article to make it easy to find. Let's look at the basic framework of our class including all the imports we will need. Skeleton class including imports import org.apache.lucene.document.Document;
import org.apache.lucene.document.Field;
import org.apache.lucene.analysis.Analyzer;
import org.apache.lucene.analysis.standard.StandardAnalyzer;
import org.apache.lucene.index.IndexWriter;
import org.apache.lucene.search.IndexSearcher;
import org.apache.lucene.search.Query;
import org.apache.lucene.queryParser.QueryParser;
import org.apache.lucene.search.Hits;
import java.util.Date;
public class ArticleIndexer {
}
The first thing we will need to add is a way to convert our article into a Document object. Method to create a Document from an article private Document createDocument(String article, String author,
String title, String topic,
String url, Date dateWritten) {
Document document = new Document();
document.add(Field.Text("author", author));
document.add(Field.Text("title", title));
document.add(Field.Text("topic", topic));
document.add(Field.UnIndexed("url", url));
document.add(Field.Keyword("date", dateWritten));
document.add(Field.UnStored("article", article));
return document;
}
First we create a new Document object. The next thing we need to do is add the different sections of the article to the Document. The names that we give to each section are completely arbitrary and work much like keys in a HashMap. The name used must be a String. The add method of Document will take a Field object which we build using one of the static methods provided in the Field class. There are four methods provided for adding Field objects to a Document.
Now that we have a Document object, we need to get an IndexWriter to write this Document to the index. Method to store a Document in the index String indexDirectory = "lucene-index";
private void indexDocument(Document document) throws Exception {
Analyzer analyzer = new StandardAnalyzer();
IndexWriter writer = new IndexWriter(indexDirectory, analyzer, false);
writer.addDocument(document);
writer.optimize();
writer.close();
}
We first create a StandardAnalyzer and then create an IndexWriter using the analyzer. In the constructor we must specify the directory where the index will reside. The boolean at the end of the constructor tells the IndexWriter whether it should create a new index or add to an existing index. When adding a new document to an existing index we would specify false. We then add the Document to the index. Finally, we optimize and then close the index. If you are going to add multiple Document objects you should always optimize and then close the index after all the Document objects have been added to the index. Now we just need to add a method to pull the pieces together. Method to drive the indexing public void indexArticle(String article, String author,
String title, String topic,
String url, Date dateWritten)
throws Exception {
Document document = createDocument(article, author,
title, topic,
url, dateWritten);
indexDocument(document);
}
Running this for an article will add that article to the index. Changing the boolean in the IndexWriter constructor to true will create an index so we should use that the first time we create an index and whenever we want to rebuild the index from scratch. Now that we have constructed an index, we need to search it for an article. Searching an IndexWe have added our articles to the index and we want to search for them. Assuming we have written a nice front-end for our users, we just need to take the user's request and run it against our index. Since we have added several different types of fields, our users have multiple search options. As we will see, we can specify which field is the default to use for searching but our users can search on any of the fields that are in our index. The code to do the search is presented here: Code to search an index - searchCriteria would be provided by the user IndexSearcher is = new IndexSearcher(indexDirectory);
Analyzer analyzer = new StandardAnalyzer();
QueryParser parser = new QueryParser("article", analyzer);
Query query = parser.parse(searchCriteria);
Hits hits = is.search(query);
Although there are a lot of classes involved here, the search is not overly complicated. The first thing we do is create an IndexSearcher object pointing to the directory where the articles have been indexed. We then create a StandardAnalyzer object. The StandardAnalyzer is passed to the constructor of a QueryParser along with the name of the default field to use for the search. This will be the field that is used if the user does not specify a field in their search criteria. We then parse the actual search criteria that was specified giving us a Query object. We can now run the Query against the IndexSearcher object. This returns a Hits object which is a collection of all the articles that met the specified criteria. Extracting the Document objects from the Hits object is done by using the doc() method of the Hits object. Extracting Document objects for (int i=0; i<hits.length(); i++) {
Document doc = hits.doc(i);
// display the articles that were found to the user
}
is.close();
The Document class has a get() method that can be used to extract the information that was stored in the index. For example, to get the author from the Document we would code doc.get("author"). Since we added the article itself as Field.UnStored, attempting to get it will return null. However, since we added the URL of the article to the index, we can get the URL and display it to the user in our result list. We should always close the IndexSearcher after we have finished extracting all the Document objects. Attempting to extract a Document after closing will generate an error: java.io.IOException: Bad file descriptor
Specifying Search CriteriaLucene supports a wide array of possible searches including AND OR and NOT, fuzzy searches, proximity searches, wildcard searches, and range searches. Let's take a look at a couple of examples: Find all of Professor Henry's articles that contain relativity and quantum physics: author:Henry relativity AND "quantum physics" Find all the articles that contain the phrase "string theory" and don't contain Einstein: "string theory" NOT Einstein Find all the articles that contain Kepler within five words of Galileo: "Galileo Kepler"~5 Find all the articles that Professor Johnson wrote in January of this year: author:Johnson date:[01/01/2004 TO 01/31/2004] If we don't specify a field, then the default is to use the field specified in the constructor of the QueryParser. In our example, that would be the article field. You can search on any field in the Document unless it was added as Field.UnIndexed. Another example of a field that you might wish to store but not index might be a short summary of the article that you wish to display to the user along with the other results. ConclusionLucene is a highly sophisticated and yet simple to use search engine. It does not automatically search your documents but it provides a framework for writing your own search. Using Lucene you could easily build a web spider for any web site. Although Lucene only supports simple text, there are Java classes that are available that can convert HTML, XML, Word documents, and PDF files into simple text. Many of these classes are available from the Lucene web site. Like many of the Jakarta projects, the documentation for Lucene is not very good, but with a little trial and error you should be able to get Lucene working. The Lucene web site: http://jakarta.apache.org/lucene Return to Top |
||||||||||||||||||||||||||||||||
Service your application with JiniLasse Koskela AbstractOne of the latest IT buzzwords has been Service-Oriented Architectures (SOA), which essentially suggests that applications built against services instead of components is a potential way to build more robust and flexible systems. While SOA has recently been tightly associated with Web Services, the concept of structuring systems as services distributed across the network isn't anything new. Jini network technology has been around for half a decade already and has proven itself as a robust technology for implementing the low-level wiring of distributed Java applications. If you have missed the Jini train so far, here's a little intro to get you up to speed with the Jini architecture within minutes, even. Jini what?In short, Jini is a technology for distributed computing on the Java platform. The word "Jini" is not an acronym although someone allegedly tried to suggest "Jini Is Not Initials" after the fact :) As is typical for the Java world, Sun Microsystems has provided a specification and an API which vendors are free to implement to their best capability. A significant part of such a specification is the set of concepts embodied in the architecture and corresponding APIs. Let's take a look at that first, before going into the details and, eventually, (drum roll, please) the code. Oh, and before we go any further, let me apologize beforehand if I seem too enthusiastic about Jini. That's only because I am. The Jini Architecture: ConceptsThe holy trinitySince Jini is a distributed architecture by nature, it's not too difficult to guess that essential parts of it are some sort of servers and the corresponding clients. In Jini, we call these "servers" as services and, well, the clients are just that. Clients. So, what is the third party in our trinity, then? Like in many other service-oriented architectures, the clients need some way of locating the services they need. Jini has the concept of lookup services. These lookup services are similar to CORBA's Naming Service, Java's JNDI trees, and UDDI registries. In fact, you could consider Jini's lookup services being sort of "live" versions of the above-mentioned alternatives. Figure 1 illustrates the dependencies and communication between the
client, the service, and the lookup service. 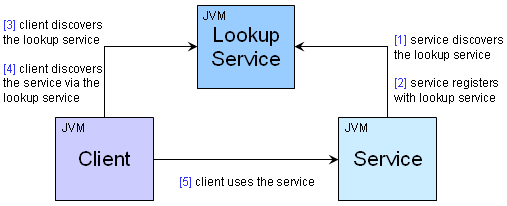 DiscoveryJini APIs provide two ways of discovering services: unicast and multicast. In the unicast scenario, the client knows where to search for services -- it knows where the lookup service can be contacted. In the multicast scenario, the client is not aware of a lookup service and relies on IP multicasting a query to which available lookup services respond. Once the client has discovered the lookup services, it then proceeds to discover the actual services registered with these lookup services. Obviously, before the clients can discover services via a lookup service, the service must register itself with the lookup service using the Jini API. Ok. The service has registered itself with a lookup service. Now how will the client know that this particular service is what she wants to use? The answer lies in the way services register themselves, providing three possible "identifiers" for the clients' disposal, namely a service ID, the service item, and a number of entries:
The multicast discovery feature of Jini's discovery mechanism allows implementing completely dynamic, self-healing network of systems and applications. The fact that you can get "connected" to a bunch of lookup services (which are just like any other Jini service, by the way) by simply shouting out loud, "any lookup services out there?", is what makes Jini's discovery mechanism such a powerful tool for building such systems. I'll get back to the Jini lookup service later in this article to discuss these unique features in more detail. For now, let's move on. LeasesWhat happens to a service registration once it has been created in the lookup service? The answer depends on two things: how the lookup service manages registered services and whether someone is looking after the service's registration. When a service is registered with a lookup service, the lookup service assigns a lease, a ticket which says "I'll keep this service registration in my records for X minutes. After that, it's gone." The Jini API lets the service request a preferred lease length but the final say is on the lookup service. Generally, lookup services don't accept "eternal" registrations but enforce some kind of a limit, which can be anything between 60 minutes to 4,32 days. Right. Leases. But what does it actually mean that the lease expires? For clients who have already discovered their services, the expiring lease does nothing -- the client uses the service directly without any participation from the lookup service it located the service through. However, since the lookup service drops the registration when a lease expires, a new client will not discover the service until it re-registers itself with the lookup service. Ahh, I see. But how does the service re-register itself, then? When a service registers with a lookup service for the first time, it often lets the lookup service assign a service ID to the service in question. If the service is down during maintenance, for example, and wants to re-register with the lookup service, it simply provides the same service ID that it had previously and the lookup service will "replace" any existing registration for that service ID. If there are multiple lookup services to register with, the service should use the same service ID for all of them. That way, a client discovering services through the multiple lookup services can easily recognize the available implementations for a certain service, identified by its "global" service ID. In fact, leases are an essential part of Jini's self-healing property! Consider a scenario where a registered service suddenly becomes unavailable due to a network problem or a system crash. With short leases, the lookup service will soon notice that the service isn't available anymore and doesn't refer any clients to it. Similarly, when the service becomes alive again, it re-registers with the lookup service and the lookup service starts referring clients to it. Better yet, the client's who need to use a currently unavailable service can register a distributed listener with the lookup service, which gets called when the required service becomes available. Now that's what I call self-healing! Think, "I don't have any color printers for you right now, but I'll let you know when I do!" The Jini Architecture: TechnologiesThe wire tap: what's going on in there?I mentioned earlier that Jini is a distributed computing technology for Java applications. While that is certainly the sweet spot for this exciting technology, Jini can be used for exposing native legacy applications to the new breed of Java-powered enterprise applications. Having said that, Jini does rely on Java's RMI (Remote Method Invocation) for implementing essential parts of the architecture. Service registration involves downloading serialized Java classes to/from the lookup service as does the service discovery process performed by the clients. Well, if the service must talk Java and the client must talk Java, how can Jini help "expose native legacy applications"? The proxy is the key. When a service is registered with a lookup service, the registrar stores a service item, a serialized Java object, into the lookup service's database. This service item can be any type of Java object as long as it's Serializable. When a client looks up the service, the lookup service passes a copy of the service item object to the client. The client only knows that she received an implementation of whatever interface the service promised to implement. The client has no idea how the object implements the service. This abstraction leaves room for a variety of approaches to implementing the service: the service item might have the ability to provide the service all by himself, or the service item might just act as a thin proxy passing method calls over the network to the actual service. Or something in between. It is the thin proxy approach that makes Jini such a nice way of exposing legacy applications to other systems within an enterprise. If the service item today communicates with the legacy applications over raw sockets and tomorrow the legacy application has been replaced with a web services-enabled version, the service is simply re-registered with an updated version of the service item and the clients won't know the difference! SecurityJini involves downloading code from "the outside world" and executing that code. This is an obvious sign for the need for security. So, how do we prevent our client from executing malicious code? The security in Jini is based on the J2SE security manager, namely, java.rmi.RMISecurityManager. The client application should have as restricted policy file as possible. In practice, most developers tend to start development with an all-forgiving "policy.all" file, which permits practically anything, and tighten up the security in the end. This is the approach we'll use in our example later in this article -- although I'm going to skip the latter part, tightening the security :) While the security features in Jini 1.x were limited to what can be done with the policy file ("only allow downloading code which is coming from server X and signed by Y"), the Jini 2.0 specification brings along a number of additional tools for making your Jini network secure, including:
Example: Fibonacci sequence as a serviceAs an introductory example, I decided to use the mathematical problem of calculating the value of a Fibonacci sequence. The Jini client wants his sequence calculated and the Jini services provide the ability to do so. To make the example a bit more illustrative, I've actually written a number of different implementations for our Fibonacci interface just like there could be a number of different implementations of your real world service. For those who don't quite remember what the Fibonacci sequence is all about, here's a brief description: F(1) = 1, F(2) = 1, F(n) = F(n ? 1) + F(n ? 2) In other words, except for F(1) and F(2), which are special cases, the nth number in the sequence is the sum of the two previous numbers. F(n) = 1 + 1 + 2 + 3 + 5 + 8 + 13 + 21 + ... System requirements for our exampleObviously, developing against the Jini APIs requires having these APIs available for the Java compiler. Furthermore, in order to make a Jini client work with a Jini service, we need the third wheel -- the lookup service. Still, in order to download code we need to serve it up from somewhere, which is why we need an HTTP server of some sort. Even though Jini 2.0 has been out there for quite some time already, I chose to use the older Jini 1.2.1 release for the example. The reason being that the 1.2.1 distribution is much easier for a beginner to grasp than the latest release, which is a lot bigger (for a reason). The code in this example should be compatible with Jini 2.0, however, with very minor changes if any. I should probably also mention that while all example scripts/code use "localhost", this, in fact, is something you should never do in real development -- in a distributed environment "localhost" means a different thing to each participating computer... Installing the Jini Starter KitYou can download the Jini Starter Kit from http://wwws.sun.com/software/communitysource/jini/download.html and unzip the archive somewhere on your harddisk. I put mine in "C:\Apps\jini-1.2.1_001" but the actual location doesn't matter. Now that you have the starter kit in place, let's take a look at how we can get the lookup service running and a HTTP server serving our code. The lookup service reference implementation, part of the Jini Starter Kit, is called "Reggie". Reggie is basically an executable JAR file which takes a few simple command-line arguments to start up (see my batch file below). startLookupService.bat:
@echo off
set REGGIE_JAR=lib\reggie.jar
set POLICY=policy.all
set CODEBASE=http://localhost:8080/reggie-dl.jar
set LOGDIR=reggie_log
set GROUPS=public
java -Djava.security.policy=%POLICY% -jar %REGGIE_JAR% %CODEBASE% %POLICY% %LOGDIR% %GROUPS%
Looking complicated? It's not. Let's go through the parameters one by one and see what they mean.
All set? Almost, but not quite. Since Reggie relies on an RMI server to run, we need to start one. Here's a command for starting up the RMI daemon, rmid, on the default port (1098): startRmiServer.bat:
@echo off
rmid -J-Djava.security.policy=policy.all -J-Dsun.rmi.activation.execPolicy=none -log rmid_logs
Note: Reggie only needs to be registered with the RMID once! After that, the RMID remembers Reggie and that it should activate it when needed -- even after restarting the RMID. This is also the reason why "startLookupService.bat" returns after a few seconds -- it doesn't need to keep running because the RMID will take care of invoking it when the time comes! Finally, we need an HTTP server to download the code from (both for using Reggie and for our services). Fortunately, the Jini Starter Kit includes a simple HTTP server which serves files from a given directory and nicely prints a log of each downloaded file: startHttpServer.bat:
@echo off
java -jar lib\tools.jar -port 8080 -dir webroot -verbose
For now, copy the reggie-dl.jar from %JINI_HOME\lib into the HTTP server's content directory ("mywebroot" in my case) so that clients can download the stubs for using the lookup service. Now we should be all set. Try running the batch files (startRmiServer.bat, startLookupService.bat, startHttpServer.bat) and see that you don't get any pesky little error messages. If you do, double-check your scripts, delete the log directories (REGGIE_DB and RMID_LOGS), and try again. If you still get errors, there's always the friendly folks at The Big Moose Saloon who are more than willing to help you out if asked nicely ;) If all went fine, you shouldn't need to touch these processes for the rest of the article. If for some reason you do need to stop them, go ahead and start them again when you want to continue (except for the lookup service which doesn't need to be restarted). Gentlemen, start your IDEs!Now that we have the necessary infrastructure running, we can move on to the fun stuff! We'll start by specifying the service we're going to use, the Fibonacci sequence calculator service, write some implementations of that service, and then proceed to writing the Jini-specific stuff -- the Jini client and the Jini service. The interfaceThe first thing to do is to specify the contract for the service, that is, the Java interface the clients will expect to get an implementation for: Fibonacci.java:
package com.javaranch.jiniarticle.service.api;
import java.rmi.RemoteException;
public interface Fibonacci {
long calculate(int n) throws RemoteException;
}
Note that I've defined the calculate() method to throw a java.rmi.RemoteException. Even though the implementation wouldn't connect to remote systems during the method call, it's a good practice to explicitly tell the client that the service might be implemented using remote method invocations, web services, and so on -- next week that may very well be the case! The implementationsNow that we have an interface to implement, let's see what kind of implementations we can come up with. First of all, I know two ways of performing the actual calculation: one in which the sequence is calculated with brute force (summing up numbers one by one with recursive method calls), and one in which the result is calculated using an approximation formula (a bit of cheating but the result is very accurate until somewhere around F(80) or so...). Let's see what those two implementations look like. The first implementation, FibonacciBasicImpl, is the brute force way. It refuses to calculate sequences beyond F(50) because of the duration will increase dramatically when n approaches such numbers. FibonacciBasicImpl.java:
package com.javaranch.jiniarticle.service.impl;
import java.io.Serializable;
import com.javaranch.jiniarticle.service.api.Fibonacci;
public class FibonacciBasicImpl implements Serializable, Fibonacci {
public long calculate(int n) {
if (n < 1 || n > 50) {
return -1;
} else if (n <= 2) {
return 1;
} else {
return calculate(n - 1) + calculate(n - 2);
}
}
}
The second implementation, FibonacciFloatImpl, is the easy-way-out method of using an approximation formula. This particular implementation performs well as long as n is small enough for the result to fit in a long. FibonacciFloatImpl.java:
package com.javaranch.jiniarticle.service.impl;
import java.io.Serializable;
import com.javaranch.jiniarticle.service.api.Fibonacci;
public class FibonacciFloatImpl implements Fibonacci, Serializable {
/** The square root of 5 is used a lot in this formula... */
private static final double SQRT5 = Math.sqrt(5.0);
public long calculate(int n) {
if (n < 1) {
return -1;
} else if (n <= 2) {
return 1;
} else {
double fpResult =
Math.pow((1 + SQRT5) / 2, (double) n) / SQRT5
- Math.pow((1 - SQRT5) / 2, (double) n) / SQRT5;
return Math.round(fpResult);
}
}
}
While we're at it, why not add a slightly optimized version of our accurate but dead-slow recursive implementation... FibonacciMemorizingImpl.java:
package com.javaranch.jiniarticle.service.impl;
import java.io.Serializable;
import java.util.HashMap;
import java.util.Map;
import com.javaranch.jiniarticle.service.api.Fibonacci;
public class FibonacciMemorizingImpl implements Fibonacci, Serializable {
private static final Map preCalculated = new HashMap();
static {
preCalculated.put(new Integer(1), new Long(1));
preCalculated.put(new Integer(2), new Long(1));
}
public long calculate(int n) {
Long value = (Long) preCalculated.get(new Integer(n));
if (value != null) {
return value.longValue();
} else {
long v = calculate(n - 1) + calculate(n - 2);
preCalculated.put(new Integer(n), new Long(v));
return v;
}
}
}
Alright. Now we have already three different implementations of the Fibonacci sequence -- and our Fibonacci interface. These implementations differ in how they perform the mathematical calculation, which indicates that it might be useful to register them with the lookup service using entries describing their performance (fast/slow) and accuracy (accurate/approximate) so that the client can pick the one implementation that best suits her needs. However, these implementations will all be executing solely within the client's JVM as none of them connects back to the service provider for performing the calculation. Maybe we should provide yet another implementation of the Fibonacci interface which acts as a proxy for a remote service doing the actual calculation? That way we would get one more differentiator into the mix and see how a thin Jini proxy can be implemented. I'll use RMI since it's the easiest way to go about it. Using raw socket communication, web services or some other method of communication is a perfectly valid choice as well, if that suits better in your environment (due to firewalls, existing APIs, etc.) -- you just need to prime your service proxy with the necessary information to open a connection back to the actual service implementation. First of all, here's the actual service implementation implemented as a remote RMI object and the remote interface used to access the service: FibonacciRemote.java:
package com.javaranch.jiniarticle.service.impl;
import com.javaranch.jiniarticle.service.api.Fibonacci;
import java.rmi.Remote;
public interface FibonacciRemote extends Fibonacci, Remote {
}
As you can see, the remote interface extends the Fibonacci interface instead of providing a different signature for the "real" service invocation. FibonacciRemoteImpl.java:
package com.javaranch.jiniarticle.service.impl;
import java.io.Serializable;
import java.rmi.RemoteException;
import java.rmi.server.UnicastRemoteObject;
import java.util.HashMap;
import java.util.Map;
public class FibonacciRemoteImpl extends UnicastRemoteObject implements FibonacciRemote, Serializable {
private static final Map preCalculated = new HashMap();
static {
preCalculated.put(new Integer(1), new Long(1));
preCalculated.put(new Integer(2), new Long(1));
}
public FibonacciRemoteImpl() throws RemoteException {
}
public long calculate(int n) throws RemoteException {
System.out.println(getClass().getName() + " calculating f(" + n + ")...");
return fibonacci(n);
}
public long fibonacci(int n) throws RemoteException {
Long value = (Long) preCalculated.get(new Integer(n));
if (value != null) {
return value.longValue();
} else {
long v = fibonacci(n - 1) + fibonacci(n - 2);
preCalculated.put(new Integer(n), new Long(v));
return v;
}
}
}
Great. Now that we have the backend service implementation all set, the only thing left is to let the client use our service somehow. This can be accomplished by registering a thin service proxy with the lookup service: FibonacciRemoteProxy.java:
package com.javaranch.jiniarticle.service.impl;
import com.javaranch.jiniarticle.service.api.Fibonacci;
import java.io.Serializable;
import java.rmi.RemoteException;
public class FibonacciRemoteProxy implements Fibonacci, Serializable {
private FibonacciRemote backend;
public FibonacciRemoteProxy() {
// create a default implementation of the backend
backend = new FibonacciRemote() {
public long calculate(int n) {
return -1;
}
};
}
public FibonacciRemoteProxy(FibonacciRemote backend) {
this.backend = backend;
}
public long calculate(int n) throws RemoteException {
System.out.println("FibonacciRemoteProxy proxying f(" + n + ") to the backend...");
return backend.calculate(n);
}
}
In practice, the client downloads this thin proxy from the lookup service and uses it like any other implementation's service item. This one just happens to make remote method invocations to the real service implementation. I put a couple of System.out.println's in there so that we can actually see with our own eyes where each piece of code gets executed. If we would've chosen raw sockets instead of RMI for our remote service implementation, the proxy class would be primed with a hostname, port number pair instead of handing out an RMI stub for the real service implementation. As you may have noticed, all of these implementations have two things in common: 1) the service item visible to the client implements the Fibonacci interface, and 2) they implement java.io.Serializable for enabling the client to download them over the network in the first place (actually, not implementing Serializable would've caused trouble already when trying to register the item with a lookup service...). Right. Now we have a service interface and a number of different, alternative implementations for that service. However, we haven't yet seen how to get these implementations registered with a lookup service. That's our next topic. The service providerIn order for anyone to be able to use our services, we need to publish them into a lookup service accessible by the client. The following class, invoked from a command prompt, discovers a lookup service and registers one instance of each of our service implementations with that lookup service. I have omitted parts of the code for brevity (the full source code is available from the References section) but I'm sure you'll be able to follow. Service.java:
package com.javaranch.jiniarticle.service;
import com.javaranch.jiniarticle.service.api.Fibonacci;
import com.javaranch.jiniarticle.service.impl.*;
import net.jini.core.discovery.LookupLocator;
import net.jini.core.entry.Entry;
import net.jini.core.lease.Lease;
import net.jini.core.lookup.ServiceID;
import net.jini.core.lookup.ServiceItem;
import net.jini.core.lookup.ServiceRegistrar;
import net.jini.core.lookup.ServiceRegistration;
import net.jini.lookup.entry.Name;
import java.io.*;
import java.net.MalformedURLException;
import java.util.Date;
public class Service {
public static void main(String[] args) throws Exception {
System.setSecurityManager(new java.rmi.RMISecurityManager());
// lookup a "registrar" for a known lookup service with
// which to register our service implementations
ServiceRegistrar registrar = lookupRegistrar();
register(registrar, new FibonacciBasicImpl());
register(registrar, new FibonacciFloatImpl());
register(registrar, new FibonacciMemorizingImpl());
FibonacciRemote backend = new FibonacciRemoteImpl();
long lease = register(registrar, new FibonacciRemoteProxy(backend));
lease = (lease - System.currentTimeMillis()) / 1000;
log("----- " + lease + " seconds until the last lease expires...");
}
private static ServiceRegistrar lookupRegistrar() {
try {
// create a "unicast lookup locator" for a known lookup service
LookupLocator locator = new LookupLocator("jini://localhost:4160");
// ask for a "registrar" to register services with
return locator.getRegistrar();
} catch (ClassNotFoundException e) {
log(e.getMessage());
} catch (MalformedURLException e) {
log(e.getMessage());
} catch (IOException e) {
log(e.getMessage());
}
return null;
}
private static long register(ServiceRegistrar reg, Fibonacci impl) {
log("----- Registering " + impl.getClass().getName() + " ...");
long lease = -1;
try {
// read the service ID from disk, if this isn't the first
// time we're registering this particular implementation
ServiceID serviceID = readServiceId(impl.getClass().getName());
// Constructing a ServiceItem to register
Entry[] entries = new Entry[1];
entries[0] = new Name(impl.getClass().getName());
ServiceItem item = new ServiceItem(serviceID, impl, entries);
// register the service implementation with the registrar
ServiceRegistration registration =
reg.register(item, Lease.FOREVER); // maximum lease
lease = registration.getLease().getExpiration();
log("Registered service "
+ registration.getServiceID().toString()
+ "\n Lookup service: "
+ reg.getLocator().getHost()
+ ":"
+ reg.getLocator().getPort()
+ "\n Lease: " + new Date(lease));
// write the service ID (back) to disk for later reference
// so that we won't be re-registering the same implementation
// to the same lookup service with different service IDs
persistServiceId(impl.getClass().getName(),
registration.getServiceID().toString());
} catch (Exception e) {
log("ERROR: " + e.getMessage());
}
return lease;
}
}
The Service class reuses existing service IDs by writing newly assigned service IDs into a "ServiceItemClass.sid" file based on the service item class name and tries to read the previously assigned and persisted service ID upon subsequent executions of the program. Notice how in the main() method the RMI-based thin proxy is created by priming it with the backend implementation's RMI stub while the standalone service items are registered as-is. The clientBrilliant! The last thing on our to-do list is the client, the application that needs someone to calculate a Fibonacci sequence for him. Since this is an example, which gives us a little artistic freedom, we'll make our client use every single one of our implementations in turn instead of just picking one and using that. Client.java:
package com.javaranch.jiniarticle.client;
import java.io.IOException;
import java.net.MalformedURLException;
import java.rmi.RemoteException;
import net.jini.core.discovery.LookupLocator;
import net.jini.core.lookup.ServiceItem;
import net.jini.core.lookup.ServiceMatches;
import net.jini.core.lookup.ServiceRegistrar;
import net.jini.core.lookup.ServiceTemplate;
import com.javaranch.jiniarticle.service.api.Fibonacci;
public class Client {
public static void main(String[] args) {
// we need to download code so we need a security manager
System.setSecurityManager(new java.rmi.RMISecurityManager());
// locate service implementations from the Jini network
Fibonacci[] services = locateFibonacciServices();
if (services.length == 0) {
System.err.println("Couldn't locate a Fibonacci service!");
System.exit(1);
}
// use the service implementations and print out their results and performances
for (int j = 0; j < services.length; j++) {
System.out.println("-----\n " + services[j].getClass().getName());
for (int i = 0; i < args.length; i++) {
int n = Integer.parseInt(args[i]);
Result result = calculate(n, services[j]);
System.out.println(" f(" + n + ") = " + result.result + "\t(" + result.duration + "ms)");
}
}
}
// a simple data structure for passing around a pair of calculation result and duration
static class Result {
long result;
long duration;
}
private static Result calculate(int n, Fibonacci implementation) {
Result result = new Result();
result.duration = System.currentTimeMillis();
try {
result.result = implementation.calculate(n);
} catch (RemoteException e) {
System.err.println(e.getMessage());
result.result = -1;
}
result.duration = System.currentTimeMillis() - result.duration;
return result;
}
private static Fibonacci[] locateFibonacciServices() {
try {
String host = "jini://localhost:4160";
System.out.println("Creating a LookupLocator for " + host);
LookupLocator locator = new LookupLocator(host);
System.out.println("Obtaining a ServiceRegistrar from the LookupLocator");
ServiceRegistrar registrar = locator.getRegistrar();
// create a "service template" describing the service for
// which we're looking for available implementations
ServiceTemplate tmpl =
new ServiceTemplate(
null,
new Class[] { Fibonacci.class },
null);
// perform a lookup based on the service template
ServiceMatches matches = registrar.lookup(tmpl, 50);
System.out.println("Found " + matches.items.length + " matching services");
Fibonacci[] services = new Fibonacci[matches.items.length];
for (int i = 0; i < matches.items.length; i++) {
ServiceItem item = matches.items[i];
services[i] = (Fibonacci) item.service;
System.out.println(" [" + i + "] " + services[i].getClass().getName());
}
return services;
} catch (MalformedURLException e) {
System.err.println("[ERROR] " + e.getMessage());
} catch (IOException e) {
System.err.println("[ERROR] " + e.getMessage());
} catch (ClassNotFoundException e) {
System.err.println("[ERROR] " + e.getMessage());
}
return new Fibonacci[0];
}
}
The client application you just saw basically looks up every service from a known lookup service that implements the Fibonacci interface, proceeds to invoke each of them for each n given as a command-line argument, and prints out the calculations' results and durations (just for fun:). Running the exampleIn order to run our example code, we need to have a lookup service running at localhost:4160, an RMI server running at localhost:1098, and an HTTP server running somewhere for the client to download the service implementations (or their proxies) as well as the lookup service's client stubs. This setup can be accomplished by running the batch scripts presented earlier in this article in the following order (remember that you only need to start each of these once -- if you started these services back in "Installing the Jini Starter Kit", you don't need to do this again):
Now that we have the infrastructure in place, it's time to build and deploy our example code. The easiest way to do this is to run the default target of the Ant build script provided as part of the article's resources archive: C:\JiniArticle> ant The default target basically compiles all the source code, packages it into a couple of JAR files in the "build" directory, and copies the necessary files into the "webroot" directory from where the HTTP server will serve them to whoever needs to download them. Next, we need to run the Service class in order to register our service implementations with the newly started lookup service. You could do this via the command-prompt or rely on the "run.service" target in the build script. Here's a batch script for registering the service implementations via command-prompt just to show what the classpath should include and what JVM arguments are required: startServices.bat:
@echo off
@rem -- Running the service registration program requires the
@rem -- com.javaranch.jiniarticle.service.* classes (service.jar)
@rem -- in its classpath as well as the Jini libraries
set CLASSPATH=-classpath build/service.jar
set CLASSPATH=%CLASSPATH%;lib/jini-core.jar
set CLASSPATH=%CLASSPATH%;lib/jini-ext.jar
set POLICY=-Djava.security.policy=policy.all
set CODEBASE=-Djava.rmi.server.codebase=http://localhost:8080/
java %CLASSPATH% %POLICY% %CODEBASE% com.javaranch.jiniarticle.service.Service
As you can see, the service registration program needs to be given a codebase. Why is that? The codebase is needed because any code we're about to "upload" to the lookup service has to carry information about where to download the rest of the code. If we would've packed up our code into a JAR file, the codebase property used here should point to a direct URL to that particular JAR file. However, since we're serving individual classes from the web server's root directory, the codebase property points to that context. (Note: the codebase must end with a slash when using this approach) Right. Let's register some Jini services! C:\JiniArticle> startServices If all goes well, you should be looking at a couple of debugging messages informing that our service implementations are successfully registered with the lookup service: C:\JiniArticleProject>startServices.bat 19:31:21 ----- Registering com.javaranch.jiniarticle.service.impl.FibonacciBasicImpl ... 19:31:21 Registered service 858ad2ab-2594-49f1-8a49-a2a4087ff568 Lookup service: ACN931JT0J:4160 Lease expires: Sun Mar 28 19:36:21 EEST 2004 19:31:21 ----- Registering com.javaranch.jiniarticle.service.impl.FibonacciFloatImpl ... 19:31:22 Registered service 2f96135e-1230-4cb6-871d-946a002eb1ae Lookup service: ACN931JT0J:4160 Lease expires: Sun Mar 28 19:36:21 EEST 2004 19:31:22 ----- Registering com.javaranch.jiniarticle.service.impl.FibonacciMemorizingImpl ... 19:31:22 Registered service 507c05ac-52e0-4d4b-b87e-f4e7f06bdad4 Lookup service: ACN931JT0J:4160 Lease expires: Sun Mar 28 19:36:22 EEST 2004 19:31:22 ----- Registering com.javaranch.jiniarticle.service.impl.FibonacciRemoteProxy ... 19:31:22 Registered service 4902a68e-c56a-4863-9e62-ed18e1f22729 Lookup service: ACN931JT0J:4160 Lease expires: Sun Mar 28 19:36:22 EEST 2004 19:31:22 ----- 299 seconds until the last lease expires... With the service implementations registered, it's time to launch the client and watch how the magic works! Again, an Ant target named "run.client" is provided which asks each implementation to calculate a couple of n's. Here's the corresponding command-prompt version to illustrate what the client JVM needs to know: startClient.bat:
@echo off
@rem -- Running the client program requires the service's interface classes
@rem -- (service-api.jar) in its classpath as well as the Jini libraries.
@rem -- Furthermore, the client's JVM needs to be instructed to use a
@rem -- policy file which permits downloading code from the lookup service
@rem -- and connecting to the service provider (FibonacciRemoteImpl).
set CLASSPATH=-classpath build/client.jar
set CLASSPATH=%CLASSPATH%;build/service-api.jar
set CLASSPATH=%CLASSPATH%;lib/jini-core.jar
set CLASSPATH=%CLASSPATH%;lib/jini-ext.jar
set POLICY=-Djava.security.policy=policy.all
java %CLASSPATH% %POLICY% com.javaranch.jiniarticle.client.Client %1 %2 %3 %4 %5
Running this script with C:\JiniArticle> startClient 1 20 35 should result in each service implementation calculating the results for f(1), f(20) and f(35), respectively. Note that it takes some time for the FibonacciBasicImpl to calculate n's beyond 30... Here's the output I got running the above script: C:\JiniArticleProject> startClient 1 20 35 Creating a LookupLocator for jini://localhost:4160 Obtaining a ServiceRegistrar from the LookupLocator Found 4 matching services [0] com.javaranch.jiniarticle.service.impl.FibonacciRemoteProxy [1] com.javaranch.jiniarticle.service.impl.FibonacciMemorizingImpl [2] com.javaranch.jiniarticle.service.impl.FibonacciFloatImpl [3] com.javaranch.jiniarticle.service.impl.FibonacciBasicImpl ----- com.javaranch.jiniarticle.service.impl.FibonacciRemoteProxy FibonacciRemoteProxy proxying f(1) to the backend... f(1) = 1 (10ms) FibonacciRemoteProxy proxying f(20) to the backend... f(20) = 6765 (10ms) FibonacciRemoteProxy proxying f(35) to the backend... f(35) = 9227465 (0ms) ----- com.javaranch.jiniarticle.service.impl.FibonacciMemorizingImpl f(1) = 1 (0ms) f(20) = 6765 (0ms) f(35) = 9227465 (0ms) ----- com.javaranch.jiniarticle.service.impl.FibonacciFloatImpl f(1) = 1 (0ms) f(20) = 6765 (0ms) f(35) = 9227465 (0ms) ----- com.javaranch.jiniarticle.service.impl.FibonacciBasicImpl f(1) = 1 (0ms) f(20) = 6765 (0ms) f(35) = 9227465 (421ms) C:\JiniArticleProject> SummaryWe've just gone through the main concepts and architecture of the Jini network technology and seen a working example of its usage. However, there's a lot more to Jini than what you've seen in this article! We passed with a mention some major features such as distributed events, the transaction service, and perhaps most importantly, JavaSpaces. Maybe we'll go into those in a follow-up article or two ;) Jini success storiesSo, we have a technology named Jini which can do all sorts of cool things, but is it being used in the Real World?? As you've probably guessed by now, the answer is yes. A good example of a real world application of Jini is the cluster implementation of Macromedia's J2EE application server, JRun 4, where the nodes in a cluster are being discovered automatically using the Jini discovery service and communicate with each other through the Jini proxies as described in the previous section. There are similar peer-to-peer communication protocols that could've done the job equally well, such as JGroups or even JXTA, but the fact that Jini is a mature standard differentiates it from the competition. Furthermore, Jini brings a lot of advanced features such as distributed transactions and events. Take a look at the links provided in References and Sun Microsystems' list of Jini success stories for more about the application of Jini technologies. Would you be surprised to learn that the U.S. military has used Jini heavily in their training and simulation systems? Resources and references
Return to Top |
||||||||||||||||||||||||||||||||
JavaServer Faces 1.0 Part Iby Gregg Bolinger What Is It? JavaServer Faces is a new framework for building J2EE base web applications. JSF was developed through the Java Community Process under JSR-127. JSF is a model-driven web component application framework whose event model has been compared to that of Swing. Why Do We Need It? Ok, I know what you are thinking. Not another framework. We don't need another framework. And I would have agreed with you a few weeks ago, but after going through the specification and working on a few sample apps myself, I realized that JSF isn't just another framework. Now I'm not here to teach you everything there is to know about JSF because, frankly, I don't know everything. I haven't been developing JSF applications for very long. In fact, the night JSF 1.0 Final was released was 2 days after I began looking at it. What I'm here to do is go through a very simple Login Web Application that will show you the very basics of JSF. This should be enough to get your doggies wet and leave you feeling all warm and cozy and confident enough to give JSF its fair shake in this competitive market of J2EE Frameworks. First Things First Since I know you are just dying to get started, let's get started. The first thing you need to do is grab a copy of the JSF 1.0 Final API and Implementation. "What's this?" you ask. I need the API and an implementation? That's right! One of the neat things about JSF is that it is really just an API or specification. Much like JDO, this allows vendors to release their own implementations of the JSF specification. But you can learn about this stuff on your own. You are here to do some coding. So off we go... Setup Now that you have the JSF API and implementation downloaded, it's time to setup the skeleton for our login example. You should unzip the jsf-1_0.zip file somewhere on your PC. The only files you will need from this zip file are some of the JAR files in the lib folder. I use IntelliJ 4.0 for all my Java development. You can use whatever you want, but for my example, you need to setup your directory structure just like mine in order for the ant build script to work correctly. That is unless you feel comfortable enough to adjust it to your liking.
The above screenshot was taken from my setup inside IntelliJ. It doesn't matter what you call the ROOT directory (mine is JSFLogin) as long as everything inside that directory is exactly like mine. Again, this is only if you want to follow along exactly with my example. This is by no means the only way to setup a J2EE project. Notice the JAR files we have in the WEB-INF/lib folder. It is important that all these are included with your application. All these JAR files come with the zip file you downloaded earlier. I'm not going into detail as to what all these jar files are used for. Just know for now that you need them for the example to work. Now would also be a good time to create the empty files you will be needing for this example. The screenshot shows every file you will need and in what directory. As we go along I will tell you what each file does. If you don't want to create them now, that's ok too. When we discuss the files I will tell you where they should go to save you from scrolling up and down in this tutorial. So let's write some code!! Coding, Coding, Coding, Keep Them Doggies Coding... The first file we are going to look at is the web.xml file. This file should be created in the WEB-INF folder. If you have done any other J2EE programming, this file will be very familiar to you, and if you have ever used Struts or WebWork, this file will look VERY familiar to you. <context-param>
<param-name>javax.faces.STATE_SAVING_METHOD</param-name>
<param-value>client</param-value>
</context-param>
The javax.faces.STATE_SAVING_METHOD is how you specify where the state of the view is saved and restored between requests. You can specify client or server. The JSF Implentation you use will default to one or the other if this is not specified. <context-param>
<param-name>javax.faces.application.CONFIG_FILES</param-name>
<param-value>/WEB-INF/faces-config.xml</param-value>
</context-param>
This context parameter specifies where the face-config.xml file resides. We will get to this file later. WEB-INF is the default location for this file, but you can use this context parameter if you wish to place it elsewhere in your web application. <servlet>
<servlet-name>Faces Servlet</servlet-name>
<servlet-class>javax.faces.webapp.FacesServlet</servlet-class>
<load-on-startup>1</load-on-startup>
</servlet>
The javax.faces.webapp.FacesServlet is where all the action takes place. FacesServlet is the Controller for the entire web application. All requests made through the servlet-mapping will be processed by the FacesServlet. <servlet-mapping>
<servlet-name>Faces Servlet</servlet-name>
<url-pattern>/faces/*</url-pattern>
</servlet-mapping>
The servlet-mapping specifies that any requests made through the url-pattern /faces/ will be processed by the FacesServlet. This is no different than any other servlet-mapping you may have done. Keep in mind though that even though we specified any (*) request after the /faces/ only those with a .jsp or .jsf will actually be processed by the FacesServlet. You can specify different extensions but that is out of the scope of this tutorial. And that's it for the web.xml file. You won't have to touch this file again. Let's move on to something a little more interesting. We need to create our LoginBean. We are going to have a view called login.jsp but in order to process the form to login we need a JavaBean associated with this form. Struts developers will find this pretty similar to the ActionForm class although our JavaBean will not subclass any special JSF classes. package jsflogin;
public class LoginBean
{
String username;
String password;
public LoginBean()
{
//Empty Constructor
}
public String getUsername()
{
return this.username;
}
public void setUsername(String data)
{
this.username = data;
}
public String getPassword()
{
return password;
}
public void setPassword(String data)
{
this.password = data;
}
}
Not really much to this JavaBean, yet. We just needed getters and setters for our 2 parameters; Username and Password. The JavaBean actually gets instantiated when the view is first loaded. As you will see in a moment, we use values from our JavaBean to set values on our form if those values exist. For example, if you enter the wrong username or password, we don't need to retype the username again so the form will get this value from the LoginBean to pre-fill that textfield, but before we get to our login.jsp page I want to show you the Message.properties file. This is a simple properties file or Resource Bundle which we use for local messages in our pages. Struts uses a very similar, almost exact in fact, method for localization. This file will need to be accessed via our classpath so it is best that it belongs somewhere under the WEB-INF/classes folder. I put it in a package to keep it separate from everything else just like we do with our Java Classes. greeting_text=Welcome I called this file Message.properties. You can call it anything you like as long as .properties is the extension. Ok, so now we will create our first view. This is the login.jsp page. <%@ taglib uri="http://java.sun.com/jsf/html" prefix="h" %> <%@ taglib uri="http://java.sun.com/jsf/core" prefix="f" %> <f:loadBundle basename="bundle.Messages" var="Message"/> We need to load 2 taglibs first. Again, this will look very familiar to Struts developers. The next line is something specific to JSF though. This is how we load our Resource Bundle. This is why you could have named it anything you wanted as long as you kept the extension. The Message.properties file is in the bundle subdirectory so we access it just like a Java class. The var attribute specifies how we are going to access this resource bundle in our page. This is basically the same as specifying the prefix attribute when specifying our Taglibs.
<f:view>
  <h:form id="loginForm">
    <h:message for="loginForm" /><br />
    <h:outputText value="#{Message.username_label}" />
    <h:inputText id="username" value="#{LoginBean.username}" required="true">
      <f:validateLength maximum="15" minimum="3" />
    </h:inputText>
    <h:message for="username" /><br />
    <h:outputText value="#{Message.password_label}" />
    <h:inputSecret id="password" value="#{LoginBean.password}" required="true">
      <f:validateLength maximum="15" minimum="3" />
    </h:inputSecret>
    <h:message for="password" /><br />
    <h:commandButton id="submit" action="#{LoginBean.login}" value="#{Message.login_button}" />
  </h:form>
</f:view>
Ok, there is a lot here that we haven't seen yet, but it should look familiar to Struts developers. Every JSF page that contains JSF specific markup will begin with the <f:view> tag. The next line just starts our form. Notice we didn't specify any kind of action or method here. This is actually handled in the submit button tag later on. <h:message for="loginForm" /> is something to take notice of. This is how we specify our error message when the login fails. We will discuss this in a moment. Notice that we are specifying "loginForm" which is also the name of our Form element. This is very important. <h:inputText id="username" value="#{LoginBean.username}" required="true">
<f:validateLength maximum="15" minimum="3" />
</h:inputText>
<h:message for="username" />
We should discuss this bit of code for a moment. Sun's implementation of JSF comes with a few standard validators. The one I use here is to validate the length of the value entered into the username field. This is pretty straightforward. Notice also how we access the username value from our LoginBean. All this validation is done server side. There is no javascript produced with this implementation. That is not to say that other implementations won't use Javascript for validation. Very easy and simple. <h:message for="username" /> is how we print out our error message if this validation fails. <h:commandButton id="submit" action="#{LoginBean.login}" value="#{Message.login_button}" />
Here is where the excitement happens. The action attribute tells JSF what method to call to process this form. This is one of my favorite aspects of JSF because for simple web applications, our Java Bean can really do it all. We need to add a method to our LoginBean class called login to handle this action. But first, we need to talk about one other file. The faces-config.xml file is the heart of a JSF web application. In this file we define our Java Beans and our navigation rules. Once again, I will mention Struts because this is very similar to the struts-config.xml file. When we define Navigation Rules we are telling the web application what to do when actions occur. So we need to define a navigation rule for our login.jsp. And we need to do something when there is a successful login and when there is an unsuccessful login. <navigation-rule>
<from-view-id>/login.jsp</from-view-id>
<navigation-case>
<from-outcome>success</from-outcome>
<to-view-id>/greeting.jsp</to-view-id>
</navigation-case>
<navigation-case>
<from-outcome>failure</from-outcome>
<to-view-id>/login.jsp</to-view-id>
</navigation-case>
</navigation-rule>
We define 2 cases here, one for "success" and one for "failure". If the login is successful we forward to the greeting.jsp page but if the login fails we go back to the login.jsp page and an error message will be displayed. Now in order for us to access our Java Beans from our JSP pages we need to define our LoginBean as a ManagedBean in our config file. <managed-bean>
<description>Login Bean Holder</description>
<managed-bean-name>LoginBean</managed-bean-name>
<managed-bean-class>jsflogin.LoginBean</managed-bean-class>
<managed-bean-scope>session</managed-bean-scope>
</managed-bean>
The managed-bean-name is the name we use to access the Bean from our JSP page. We have given this bean a session scope which is probably not necessary. We could also have given it request, application, or context scope. All this does is put an instance of the LoginBean in the correct scope and using the JSF syntax we access the bean's properties just like using JSP's useBean tag. But we still haven't talked about the login method that we called as the action for the submit on the form. Let's take a look at that method. public String login()
{
if ( username.equals("sam") && password.equals("iam"))
{
return "success";
}
else
{
FacesContext context = FacesContext.getCurrentInstance();
FacesMessage message = new FacesMessage("Invalid Username and/or Password");
context.addMessage("loginForm", message);
return "failure";
}
}
The first thing we do is see if the username and password are valid. If they are we simply return "success". If you recall from our navigation rules, we know that a success means forward to greeting.jsp. However, if the username and/or password are invalid we have a little work to do. We need to get the FacesContext because this is where we place our FacesMessage then we create a new FacesMessage with a simple text message of the problem. And then we add this message to the context giving it a key name of "loginForm" which, if you recall, is the name of our form and the ID we told our global error message to print for. Finally, we return "failure" so that our Navigation rule will send us back to the login.jsp page; nothing to it. Lastly, we need to create our greeting.jsp. <%@ taglib uri="http://java.sun.com/jsf/html" prefix="h" %>
<%@ taglib uri="http://java.sun.com/jsf/core" prefix="f" %>
<f:loadBundle basename="bundle.Messages" var="Message"/>
<html>
<head> <title>Greeting Page</title> </head>
<body>
<f:view>
<h3>
<h:outputText value="#{Message.greeting_text}" />,
<h:outputText value="#{LoginBean.username}" />!
</h3>
</f:view>
</body>
</html>
And that's all there is to it. Run the deploy target in the ant script provided in the resources link below, copy the WAR file to Tomcat's webapp folder, start Tomcat and go to http://localhost:8080/jsflogin/faces/login.jsp supplying the correct parameters for your setup. I have provided some screenshots of what your application should look like inside the browser below. Initial Login Page
Validation Error - Nothing was entered in the password field
Validation Error - Invalid data lengths
Login Error - Username and Password were invalid
Successful Login 
Conclusion JavaServer Faces future remains to be seen. But as you can see from this tutorial, it's not that difficult of a framework. In fact, I found it easier to get a grasp of than Struts. The tools that become available for JSF are going to be the key to its dexterity and from what I have been reading, a lot of tools are on the way. In Part 2 of my JSF tutorial series I will demonstrate how to perform custom validation and we will look at how we can easily bind data to form elements like select lists. Resources
Return to Top |
||||||||||||||||||||||||||||||||
JavaRanch Won Another Award!by Kathy Sierra For a second year, JavaRanch wows the Software Development Conference and takes home a Productivity Award. The crowd is mad with anticipation. Industry luminaries shine from every seat in the theater. The papprazzi are poised with cameras and cellphones, waiting to call in a story the instant the winners are announced. It's finally time for the Jolt Cola Awards. But first, the attendees have to suffer through a near-endless list of categories... Best Technical Book... Best Design and Analysis Tools... Best Change and Configuration Management Tools... Best Beer For Coding... and on it goes. Nobody tries to leave though. Because they're all here for one reason only--to find out who wins the award for Websites and Developer Networks. Finally, all the other winners in the other categories have been announced. And just like the Academy Awards, the best category has been saved for last. The announcer clears her throat. Then a hush falls over the audience. The IBM guy is squirming. The Microsoft guy is sweating. The Cowgirl is smacking her Jolt cola gum and trying to stare down Scott Ambler (his Agile Modeling Home Page is a finalist too). And then it happens... JavaRanch is a winner! Ten thousand people leap to their feet in the most thunderous standing ovation ever experienced at a geek convention. Or maybe it was the blood rushing to the Cowgirl's head. Did we win the Top Prize? The silly little can of Jolt Cola encased in lucite? No. Of course not. You know, it's all so *political*. But we DID win the cooler, less pretentious prize... the Productivity Award. And once again, the world knows that all-volunteer JavaRanch kicked Bill Gate's butt. The Microsoft site won nothing. Unfortunately, the Trail Boss couldn't be there to accept the award, so the Cowgirl had to once again fight off the adoring JavaRanch fans and kick her way to the stage for the fabulous Productivity Award plaque. Productivity Award Winners don't get to make a speech, but if JavaRanch had won, the Trail Boss had asked the Cowgirl to thank all the little people that made it all possible, like the Bartenders and Sheriffs. Most of all, though he wanted her to thank the REAL superstars of JavaRanch... Ranch Hands and Greenhorns. The ones who ask and answer the questions, and make things so fun around here. Return to Top |
||||||||||||||||||||||||||||||||
The Coffee House
JavaRanch Finds Its Inner Goddessby Solveig Haugland It was that time of year. The time that every cowboy dreads, and the time that Brenda and Lacey counted down on their calendars.Not daylight saving time. Not the first crocus. Cowboy Bath Time. The cowboys approached Spring Bath Time as they would an annual root canal. They probably wouldn't have approached it at all except that city ordinance required that every cowboy bathe at least once a year. The only drawback for the city was that cowboy bathtime had a "trust but verify" clause. Usually they outsourced this to Kitty and the Gals in their place of business at the edge of town. Kitty and the gals already had real strong stomachs. It was a staggered schedule, and today was Zeke's turn. He chose to do it at night for a better sense of privacy and to help give the illusion that taking a bath was just a bad dream. This also meant, however, that going through the storage shed for bathing supplies had to be done by moonlight. Luckily, it was a full moon, he observed to the sheriff (there to verify the bathing event), as he squinted at one item after another and tossed it over his shoulder. 
"I tell you, the leadup is almost worse than the event itself. It's like I have to do spring cleaning at the same time. What the heck is this?" Zeke grumbled as he tossed yet another mysterious cord over his shoulder. "And I tell you, I have absolutely no memory of ever using HyperCard." The HyperCard diskettes followed the cord. The whole yard was littered with old cords, an assortment of Newtons, several Mac SE30s, and a whole lot more Mardi Gras beads than you'd expect. The sheriff was clearly uncomfortable. "I see your bathtub in the back. Haul it out and let me get out of here before you discover Elvis back there." The men hauled out Zeke's tub, which was the classic round tin tub that all the cowboys used except that it had a nice coat of gold spray paint from back when Sid was using it as a pedestal in his rodeo halftime gig. The men filled it with ten parts water, two parts disinfectant, and one part Golden Raspberry Souffle bath salts. The sheriff raised an eyebrows and declared an intense desire not to know. And having seen enough to figure Zeke was going to go through with it, got Zeke's signature on the bathing sheet and high tailed it the heck on out of there. Zeke stripped off one layer of crispy clothing after another, submerging them in the separate tub that was needless to say one part water and one part disinfectant. He downed the pint of vodka that he always had handy when undergoing major surgery and, a little more relaxed, slipped into the tub. He even started splashing about happily and humming "I Feel Pretty" under his breath. A half hour later, the vodka had had its effect. Naked as a jaybird and drunk as a skunk, Zeke rose out of the tub and started dancing around under the trees. "I Feel Pretty" gave way to "Java Jive" which gave way to "Holy mother of McNealy!" when he stumbled into a clearing and ran full tilt into fourteen of the prettiest half-naked women he'd ever seen. Zeke ducked behind the first cover he could find, which as he would discover later was a poison ivy bush, and his eyes got about seven inches across each. "What in the world are you doin' here, you hussies?!"  (Zeke was a major movie fan and was secretly afraid that the women might
love him up and then turn him into a horny toad. Though to be strictly accurate,
afraid wasn't quite the right term.)
(Zeke was a major movie fan and was secretly afraid that the women might
love him up and then turn him into a horny toad. Though to be strictly accurate,
afraid wasn't quite the right term.)The women smiled gently at him. Zeke was quite a sight--wild long hair, Mardi Gras beads around his neck, and of course naked with glittery bits of Golden Raspberry Souffle bath salts making his body all glittery and stuff. He didn't really look like himself. Which is good and is what made what comes next not that odd. "Are you our spirit guide?" said one of the women, wearing a diaphanous gauze skirt and a bikini that said Free Tibet on one side and Free Che Guevara on the other side. "Don't be silly, Cilantro," said another woman in more of a sari kind of arrangement. "Marita said that our spirit guide would be young and hunky. Or else a badger. She was kind of vague." "Sunshine, you're remembering last year's Burning Butterfly festival," said a third woman who seemed to be doing a badly executed but enthusiastic body art sort of thing. "This year our spiritual forest experience will take the form of a technopagan transpersonal breathing transfer. Ooh look, there's all those antique computers strewn around a Golden Orb of spiritual transference. This is it! Cilantro, get him before he leaves our dimension!" Cilantro threw Zeke over her shoulder and the whole crowd of women rushed toward the Golden Orb of spiritual transference, formerly known as Zeke's bathtub. They threw the Mardi Gras beads around their necks, drank from Zeke's spare bottle of vodka, and, before he could stop them, just a bit from the disinfectant/bath salts mix which luckily did nothing more than lend a certain sparkliness to their technopagan transpersonal breathing transfer experience. Then they knelt and stared into the SE30s. Cilantro and Sunshine had a shared vision in which Linus Torvalds appeared to them in kind of a Barbarella environment and left them with a really great GUI for a new Linux distro. Magenta just lay on the ground and muttered a string of primitive sizes over and over again. Spruce had a vision of a world in which all software was open source and everyone had access to the tools they needed for personal and professional growth, and self-actualized on the spot. Nectar apparently got a little too much disinfectant and channeled Bill Gates' Windows 95 launch speech, throwing up in the bushes for several minutes afterwards. Zeke, who Cilantro deposited in the Golden Orb, sat there shuddering with his eyes closed for a few minutes but then thought, "Dang, what in tarnation am I doing with my eyes closed?" and watched the whole multi-hour event. He realized that it was the world-famous annual hippiefest Burning Butterfly, which chooses a different location every year to Peace Out and Channel and to Find Inner Goddesses who might have been left behind by other hippie fests in years past. Zeke, shall we say, enjoyed himself mightily and while a little pruny when he got out the next morning, to the astonishment of the post-bathing verifier who came by to check him out, Needless to say, this gave Zeke a whole new attitude toward bathing. He even burned the old clothes and ordered some new ones, though he of course used any opportunity to accidentally take them off, drink some vodka, and flit around the forest on his north 40. And he was not disappointed. Burning Butterfly's technopagan transpersonal experience was such a great experience for Cilantro and Sunshine and the gang that they started making it a monthly event, making sure to drink only moderate amounts of the Golden Orb's special sparkly contents, and Zeke used the dating design patterns Interested Listener, Pan-Dimensional Renaissance Differentiator, and Half Bad Boy Plus Protocol on Nectar that after one of the Burning Butterfly events she just didn't go back and she and Zeke now do yoga together regularly and find their inner goddesses together nearly nightly. Solveig Haugland is an independent trainer and author near Boulder, Colorado. She's the author of Dating Design Patterns, the original reusable solutions to recurring problems, recently profiled on Slashdot in such a way as to make the skeptical think it was a joke. But it ain't. She also spends her time creating learning materials and doing training through her company GetOpenOffice.org for those switching from Microsoft Office, and Techwriter Stuff: The Single Source, t-shirts and mugs for techwriters and those who love them. Return to Top |
||||||||||||||||||||||||||||||||
Touring the Commons - Part 3by Jason Menard This is the third in a three part series discussing elements of the Jakarta Commons project. The first part discussed the Commons BeanUtils package, the second part discussed the Commons Digester package, and the final part demonstrates using these packages together to build a framework for dynamically generating data transfer objects. IntroductionIn the first two parts of this series we learned how to create and use DynaBeans and how to use Digester to map XML to objects. This article assumes that you have already read the previous two parts of this series and builds on that material. This time around we are going to combine what we learned and use the Digester and BeanUtils packages to create something truly useful - a framework for dynamic data transfer objects, or DTOs. I'll refer to these as DynaDTOs. A DTO is a serializable object which represents the state of a business object. More specifically, a DTO is an object containing a business object's data which may easily be transported throughout the system. By "easily transported" I mean that it is serializable and does not contain extraneous business logic. These are pretty lightweight objects. A DTO may be something as simple as a Map, but often it is a JavaBean. Creating a whole slew of JavaBeans for this purpose could certainly be tedious. Wouldn't it be nice if there were an easier way? Instead of having to hand code all those JavaBeans, it might be easier if we could simply define them using XML, similar to how one may define DynaActionForms in Struts. The combination of the BeanUtils and Digester packages will allow us to do precisely this. DTO ConfigurationI first need to determine how I want to configure the DTOs in XML. Assume I want to define a DTO "book", which has properties of "title", "author", "isbn", "datePublished", and "numberOfPages". With this in mind, I chose to go with the following representation:
I'm still missing something here. I have already stated that I'm going to create DynaBeans for these DTOs, but I never specified whether I would use a BasicDynaBean, a DynaBean of my own creation, or whether I would keep things a bit flexible and allow DTOs to use any implementation of DynaBean. It's probably best to keep things flexible, so I'll add an optional "type" attribute to the <dto> element to facilitate this.
If you look at the above XML, you'll notice that I declared "author" to be an Object. That's because my business object Book has another business object Author assigned to its "author" property. Remember, DTOs represent data from business objects, so the structure of our DTOs will often mirror the structure of the business objects whose data they will contain. What this tells me is that I also need a DTO for "author", whose properties happen to be "lastName" and "firstName".
Now that I have defined more than one DTO, I need to add another element to my XML to contain these DTO configurations.
Here is a DTD for the dto-config.
See dto-config.xml and dynaDTO.dtd for the complete version of each file. DynaDTOFactoryNow that we have a handle on what our XML will look like, the next problems to address are 1) how is the programmer going to get access to his DTOs, and 2) how are we going to digest the XML. Keep in mind that we've already stated up front that we are going to use the Commons Digester package to do much of the grunt work, so that gives us a starting point. I made the determination to have a factory that will provide new instances of DTOs, which I call DynaDTOFactory. The DynaDTOFactory will be responsible for parsing the dto-config file and returning new instances of DTOs specified in the dto-config file. Take a look at DynaDTOFactory.java to view the entire class. Looking at the class there are a couple of things to note. The DynaDTOFactory assumes by default that our dto-config file will be named "dto-config.xml", although I have provided a constructor which takes the name of a config file if you wish to call it something else. We can also see that a new DTO may be instantiated via a newInstance(String name), where name is the "name" attribute of a given <dto> element. There is a Map which will be used to hold the DynaClass objects which will be needed to instantiate each DTO, keyed by the "name" attribute of the <dto> element. DynaClasses are added to the Map via the addDynaClass(DynaClass dynaClass) method. Here's what we have so far:
You'll notice that the constructors call an init() method. This is the method that will set up our Digester to parse the XML.
The init() method loads the dto-config.xml file, instantiates and sets up an instance of Digester, pushes this instance of DynaDTOFactory onto the digester's stack, and parses the dto-config. Having already read my article on Digester, you likely astutely noticed that there are no processing rules present. The Digester package allows pluggable rule sets, and we have taken advantage of that here. Digester's addRuleSet() method takes as a an instance of the RuleSet interface, which contains the actual processing rules. parameter This allows the ability to not only separate out the processing rules, but also to dynamically specify a set of processing rules an instance of Digester uses to parse the XML. In this particular case, we are using an instance of RuleSet to provide a clean separation. In our init() method, take notice of how we do this:
DynaDTORuleSet is the custom implementation of the RuleSet interface that will be used to contain our processing rules. DynaDTORuleSetThe custom implementation of RuleSet, DynaDTORuleSet, is where most of the magic takes place. This class will contain the processing rules necessary to turn our XML into actual DynaBeans. The Digester package provides an abstract implementation of the RuleSet interface called RuleSetBase, which DynaDTORuleSet will extend. The abstract method addRuleInstances(Digester digester) must be implemented, and this is where we stick the actual processing rules. Looking back at our XML, let's see what we actually need to do before we start writing our processing rules:
Examining item #1, this sounds like it should be an ObjectCreateRule. In the previous article, we used Digester's addObjectCreate() method to register a default ObjectCreateRule. Unfortunately, you can only use that rule to create objects that have no-argument constructors, and DynaClass objects require arguments in order to be constructed. Digester provides another type of Rule which is exactly what we are looking for though: the FactoryCreateRule. The FactoryCreateRule is to be used where there is a need to create objects whose constructors require arguments, or where some kind of set-up is needed prior to construction. We're actually going to kill two birds with one stone here, because not only does will we create an object with this rule, but the object we create will be popped off the stack when the ending tag is processed, thus satisfying item #4 above. A FactoryCreateRule requires an implementation of the ObjectCreationFactory interface, and this is what we will need to implement. The particular implementation of ObjectCreationFactory for this purpose will be called DynaClassFactory. With that in mind, here's what our RuleSet should look like up to this point:
We'll get back to the specific implementation of DynaClassFactory later. For now let's figure out what other processing rules we need. Item #2 on our list tells us that we need a rule to create DynaProperty objects. While the first instinct might be to think of writing another FactoryCreateRule, that wouldn't be quite what we're looking for. The FactoryCreateRule would pop our DynaProperty off of the stack after it is created, but the behavior we desire in this case is to leave it on the stack for now. Therefore what we really need to create is just a generic rule via Digester's addRule() method. The addRule() method requires an argument of type Rule, which we will need to implement, and we will call it AddPropertyRule(). Here's our RuleSet after this step:
Looking at item #3, it becomes evident that we will have to create yet another custom rule, which we'll call AddPropertiesRule(). That's the last rule we need though, so we can finish off our RuleSet.
There really isn't much involved with the actual RuleSet. It gets a little more involved though when we need to provide the specific implementations we've identified. AddPropertyRuleAddPropertyRule is the simplest, so we'll start there. We've already identified what it is we want to accomplish with this rule in item #2 above, so be sure to keep this in mind. We're going to extend the Rule class, and since we want our behavior to occur when the beginning of the specified element is encountered, we need to override the begin() method.
The Attributes object gives us access to the attributes we specified in the XML, which in this case are the "name" and "type" attributes. A DynaProperty requires a property name and a class in order to be constructed, so it's simple enough to take the information that was set in the XML and construct a DynaProperty. Then we just need to push the DynaProperty onto the stack and we're done. AddPropertiesRulePreviously it was stated that when the ending This should be straightforward enough, but we need to decide what implementation of DynaClass to add the DynaProperty objects to. BasicDynaClass has a setProperties(DynaProperty[] properties) method which would be useful, but unfortunately it's protected. This means that we need to provide our own implementation of the DynaClass interface. I've decided to extend BasicDynaClass and provide the needed functionality in the DynaDTODynaClass class. See DynaDTODynaClass.java for the code. Now all that remains is to actually implement the AddPropertiesRule class. Keep in mind that the DynaClass will be popped off the stack by the FactoryCreateRule, so we need to leave it on the stack for now.
DynaClassFactoryPlease go back and re-read what our goals for this class are. When the beginning A decision needs to be made regarding what types of DynaBeans are going to be instantiated by our DynaClasses. We could simply go with BasicDynaBean classes, but that's a little bit limiting. BasicDynaBean does not provide proper equals(), hashCode(), and toString() methods, and these are something that might come in handy for our DTOs. To remedy this, let's just extend BasicDynaBean into a class that we'll call DynaDTODynaBean. See DynaDTODynaBean.java for the code. Since we are extending AbstractObjectCreationFactory, creating our implementation of ObjectCreationFactory is as simple as overriding the createObject() method. We use the Java Reflection API to dynamically create the specific DynaClass objects we need.
ConclusionThat's really all there is to it. Take a look at DynaDTORuleSet.java for the code for DynaDTORuleSet as well as the three Rule implementations. Here's a simple driver (DynaDTOFactoryDriver.java) that demonstrates our DynaDTOs in action.
The Commons BeanUtils and Digester packages are extremely useful by themselves, but as I hope I've shown here, when they are combined together, they can work some pretty powerful mojo. Resources
Return to Top |
||||||||||||||||||||||||||||||||
|
If you've a photo of yourself in a fun, far off land sporting some hip JavaRanch gear, or even checking out JavaRanch.com with your laptop or mobile phone, send us an email to aroundtheworld@javaranch.com and we'll post your mug shot here and make you famous.
Return to Top |
||||||||||||||||||||||||||||||||
AnnouncementsMarch was one busy month around the Ranch. Here's a few of the local happenings you might have missed during the storm. We're getting a second server! Now hear this New Bartenders Ant Forum Changes Return to Top |
||||||||||||||||||||||||||||||||
Mosey on over to The Cattle Drive Forum in The Big Moose Saloon! Return to Top |
||||||||||||||||||||||||||||||||
Discuss this book review in The Big Moose Saloon! Return to Top |
||||||||||||||||||||||||||||||||
|
Following are the scheduled book promotions for April. Be sure to check our book promotions page often for changes and new promotions.
Return to Top |
||||||||||||||||||||||||||||||||


 Whizlabs SCBCD Exam Simulator
 Java Regular Expressions
 Pro Jakarta Commons
 Enterprise Java 2 Security: Building Secure and Robust J2EE Applications
 Enterprise Patterns and MDA : Building Better Software with Archetype Patterns and UML
 Software by Numbers: Low-Risk, High-Return Development
 The JFC Swing Tutorial: A Guide to Constructing GUIs, Second Edition