by Gregg Bolinger
What Is It?
JavaServer Faces is a new framework for building J2EE base web applications. JSF was developed through the Java Community Process under JSR-127. JSF is a model-driven web component application framework whose event model has been compared to that of Swing.
Why Do We Need It?
Ok, I know what you are thinking. Not another framework. We don't need another framework. And I would have agreed with you a few weeks ago, but after going through the specification and working on a few sample apps myself, I realized that JSF isn't just another framework. Now I'm not here to teach you everything there is to know about JSF because, frankly, I don't know everything. I haven't been developing JSF applications for very long. In fact, the night JSF 1.0 Final was released was 2 days after I began looking at it. What I'm here to do is go through a very simple Login Web Application that will show you the very basics of JSF. This should be enough to get your doggies wet and leave you feeling all warm and cozy and confident enough to give JSF its fair shake in this competitive market of J2EE Frameworks.
First Things First
Since I know you are just dying to get started, let's get started. The first thing you need to do is grab a copy of the JSF 1.0 Final API and Implementation. "What's this?" you ask. I need the API and an implementation? That's right! One of the neat things about JSF is that it is really just an API or specification. Much like JDO, this allows vendors to release their own implementations of the JSF specification. But you can learn about this stuff on your own. You are here to do some coding. So off we go...
Setup
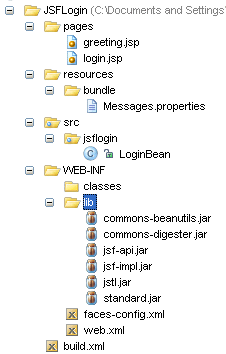
Now that you have the JSF API and implementation downloaded, it's time to setup the skeleton for our login example. You should unzip the jsf-1_0.zip file somewhere on your PC. The only files you will need from this zip file are some of the JAR files in the lib folder. I use IntelliJ 4.0 for all my Java development. You can use whatever you want, but for my example, you need to setup your directory structure just like mine in order for the ant build script to work correctly. That is unless you feel comfortable enough to adjust it to your liking.

The above screenshot was taken from my setup inside IntelliJ. It doesn't matter what you call the ROOT directory (mine is JSFLogin) as long as everything inside that directory is exactly like mine. Again, this is only if you want to follow along exactly with my example. This is by no means the only way to setup a J2EE project.
Notice the JAR files we have in the WEB-INF/lib folder. It is important that all these are included with your application. All these JAR files come with the zip file you downloaded earlier. I'm not going into detail as to what all these jar files are used for. Just know for now that you need them for the example to work.
Now would also be a good time to create the empty files you will be needing for this example. The screenshot shows every file you will need and in what directory. As we go along I will tell you what each file does. If you don't want to create them now, that's ok too. When we discuss the files I will tell you where they should go to save you from scrolling up and down in this tutorial. So let's write some code!!
Coding, Coding, Coding, Keep Them Doggies Coding...
The first file we are going to look at is the web.xml file. This file should be created in the WEB-INF folder. If you have done any other J2EE programming, this file will be very familiar to you, and if you have ever used Struts or WebWork, this file will look VERY familiar to you.
<context-param>
    <param-name>javax.faces.STATE_SAVING_METHOD</param-name>
    <param-value>client</param-value>
</context-param>
The javax.faces.STATE_SAVING_METHOD is how you specify where the state of the view is saved and restored between requests. You can specify client or server. The JSF Implentation you use will default to one or the other if this is not specified.
<context-param>
    <param-name>javax.faces.application.CONFIG_FILES</param-name>
    <param-value>/WEB-INF/faces-config.xml</param-value>
</context-param>
This context parameter specifies where the face-config.xml file resides. We will get to this file later. WEB-INF is the default location for this file, but you can use this context parameter if you wish to place it elsewhere in your web application.
<servlet>
    <servlet-name>Faces Servlet</servlet-name>
    <servlet-class>javax.faces.webapp.FacesServlet</servlet-class>
    <load-on-startup>1</load-on-startup>
</servlet>
The javax.faces.webapp.FacesServlet is where all the action takes place. FacesServlet is the Controller for the entire web application. All requests made through the servlet-mapping will be processed by the FacesServlet.
<servlet-mapping>
    <servlet-name>Faces Servlet</servlet-name>
    <url-pattern>/faces/*</url-pattern>
</servlet-mapping>
The servlet-mapping specifies that any requests made through the url-pattern /faces/ will be processed by the FacesServlet. This is no different than any other servlet-mapping you may have done. Keep in mind though that even though we specified any (*) request after the /faces/ only those with a .jsp or .jsf will actually be processed by the FacesServlet. You can specify different extensions but that is out of the scope of this tutorial.
And that's it for the web.xml file. You won't have to touch this file again.
Let's move on to something a little more interesting. We need to create our LoginBean. We are going to have a view called login.jsp but in order to process the form to login we need a JavaBean associated with this form. Struts developers will find this pretty similar to the ActionForm class although our JavaBean will not subclass any special JSF classes.
package jsflogin;

public class LoginBean
{
    String username;
    String password;

    public LoginBean()
    {
       //Empty Constructor
    }

    public String getUsername()
    {
        return this.username;
    }

    public void setUsername(String data)
    {
        this.username = data;
    }

    public String getPassword()
    {
        return password;
    }

    public void setPassword(String data)
    {
        this.password = data;
    }
}
Not really much to this JavaBean, yet. We just needed getters and setters for our 2 parameters; Username and Password. The JavaBean actually gets instantiated when the view is first loaded. As you will see in a moment, we use values from our JavaBean to set values on our form if those values exist. For example, if you enter the wrong username or password, we don't need to retype the username again so the form will get this value from the LoginBean to pre-fill that textfield, but before we get to our login.jsp page I want to show you the Message.properties file. This is a simple properties file or Resource Bundle which we use for local messages in our pages. Struts uses a very similar, almost exact in fact, method for localization. This file will need to be accessed via our classpath so it is best that it belongs somewhere under the WEB-INF/classes folder. I put it in a package to keep it separate from everything else just like we do with our Java Classes.
greeting_text=Welcome
username_label=Username
password_label=Password
login_button=Login
I called this file Message.properties. You can call it anything you like as long as .properties is the extension. Ok, so now we will create our first view. This is the login.jsp page.
<%@ taglib uri="http://java.sun.com/jsf/html" prefix="h" %>
<%@ taglib uri="http://java.sun.com/jsf/core" prefix="f" %>
<f:loadBundle basename="bundle.Messages" var="Message"/>
We need to load 2 taglibs first. Again, this will look very familiar to Struts developers. The next line is something specific to JSF though. This is how we load our Resource Bundle. This is why you could have named it anything you wanted as long as you kept the extension. The Message.properties file is in the bundle subdirectory so we access it just like a Java class. The var attribute specifies how we are going to access this resource bundle in our page. This is basically the same as specifying the prefix attribute when specifying our Taglibs.
<f:view>
  <h:form id="loginForm">
    <h:message for="loginForm" /><br />
    <h:outputText value="#{Message.username_label}" />
    <h:inputText id="username" value="#{LoginBean.username}" required="true">
      <f:validateLength maximum="15" minimum="3" />
    </h:inputText>
    <h:message for="username" /><br />
    <h:outputText value="#{Message.password_label}" />
    <h:inputSecret id="password" value="#{LoginBean.password}" required="true">
      <f:validateLength maximum="15" minimum="3" />
    </h:inputSecret>
    <h:message for="password" /><br />
    <h:commandButton id="submit" action="#{LoginBean.login}" value="#{Message.login_button}" />
  </h:form>
</f:view>
Ok, there is a lot here that we haven't seen yet, but it should look familiar to Struts developers. Every JSF page that contains JSF specific markup will begin with the <f:view> tag. The next line just starts our form. Notice we didn't specify any kind of action or method here. This is actually handled in the submit button tag later on. <h:message for="loginForm" /> is something to take notice of. This is how we specify our error message when the login fails. We will discuss this in a moment. Notice that we are specifying "loginForm" which is also the name of our Form element. This is very important.
<h:inputText id="username" value="#{LoginBean.username}" required="true">
           <f:validateLength maximum="15" minimum="3" />
</h:inputText>
<h:message for="username" />
We should discuss this bit of code for a moment. Sun's implementation of JSF comes with a few standard validators. The one I use here is to validate the length of the value entered into the username field. This is pretty straightforward. Notice also how we access the username value from our LoginBean. All this validation is done server side. There is no javascript produced with this implementation. That is not to say that other implementations won't use Javascript for validation. Very easy and simple. <h:message for="username" /> is how we print out our error message if this validation fails.
<h:commandButton id="submit" action="#{LoginBean.login}" value="#{Message.login_button}" />
Here is where the excitement happens. The action attribute tells JSF what method to call to process this form. This is one of my favorite aspects of JSF because for simple web applications, our Java Bean can really do it all. We need to add a method to our LoginBean class called login to handle this action. But first, we need to talk about one other file.
The faces-config.xml file is the heart of a JSF web application. In this file we define our Java Beans and our navigation rules. Once again, I will mention Struts because this is very similar to the struts-config.xml file. When we define Navigation Rules we are telling the web application what to do when actions occur. So we need to define a navigation rule for our login.jsp. And we need to do something when there is a successful login and when there is an unsuccessful login.
   <navigation-rule>
        <from-view-id>/login.jsp</from-view-id>
        <navigation-case>
            <from-outcome>success</from-outcome>
            <to-view-id>/greeting.jsp</to-view-id>
        </navigation-case>
         <navigation-case>
             <from-outcome>failure</from-outcome>
             <to-view-id>/login.jsp</to-view-id>
         </navigation-case>
    </navigation-rule>
We define 2 cases here, one for "success" and one for "failure". If the login is successful we forward to the greeting.jsp page but if the login fails we go back to the login.jsp page and an error message will be displayed.
Now in order for us to access our Java Beans from our JSP pages we need to define our LoginBean as a ManagedBean in our config file.
   <managed-bean>
        <description>Login Bean Holder</description>
        <managed-bean-name>LoginBean</managed-bean-name>
        <managed-bean-class>jsflogin.LoginBean</managed-bean-class>
        <managed-bean-scope>session</managed-bean-scope>
    </managed-bean>
The managed-bean-name is the name we use to access the Bean from our JSP page. We have given this bean a session scope which is probably not necessary. We could also have given it request, application, or context scope. All this does is put an instance of the LoginBean in the correct scope and using the JSF syntax we access the bean's properties just like using JSP's useBean tag. But we still haven't talked about the login method that we called as the action for the submit on the form. Let's take a look at that method.
public String login()
{
    if ( username.equals("sam") && password.equals("iam"))
    {
        return "success";
    }
    else
    {
        FacesContext context = FacesContext.getCurrentInstance();
        FacesMessage message = new FacesMessage("Invalid Username and/or Password");
        context.addMessage("loginForm", message);
        return "failure";
    }
}
The first thing we do is see if the username and password are valid. If they are we simply return "success". If you recall from our navigation rules, we know that a success means forward to greeting.jsp. However, if the username and/or password are invalid we have a little work to do. We need to get the FacesContext because this is where we place our FacesMessage then we create a new FacesMessage with a simple text message of the problem. And then we add this message to the context giving it a key name of "loginForm" which, if you recall, is the name of our form and the ID we told our global error message to print for. Finally, we return "failure" so that our Navigation rule will send us back to the login.jsp page; nothing to it.
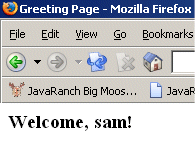
Lastly, we need to create our greeting.jsp.
<%@ taglib uri="http://java.sun.com/jsf/html" prefix="h" %>
<%@ taglib uri="http://java.sun.com/jsf/core" prefix="f" %>
<f:loadBundle basename="bundle.Messages" var="Message"/>

<html>
  <head> <title>Greeting Page</title> </head>

  <body>
     <f:view>
        <h3>
           <h:outputText value="#{Message.greeting_text}" />,
           <h:outputText value="#{LoginBean.username}" />!
        </h3>
     </f:view>
 </body>
</html>
And that's all there is to it. Run the deploy target in the ant script provided in the resources link below, copy the WAR file to Tomcat's webapp folder, start Tomcat and go to http://localhost:8080/jsflogin/faces/login.jsp supplying the correct parameters for your setup. I have provided some screenshots of what your application should look like inside the browser below.
Initial Login Page

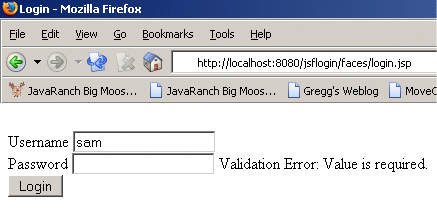
Validation Error - Nothing was entered in the password field
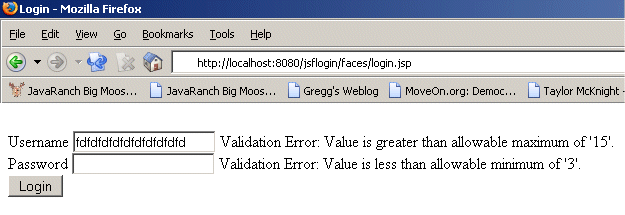
Validation Error - Invalid data lengths
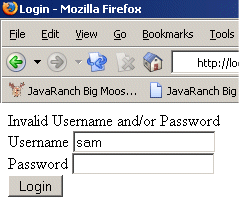
Login Error - Username and Password were invalid
Successful Login
Conclusion
JavaServer Faces future remains to be seen. But as you can see from this tutorial, it's not that difficult of a framework. In fact, I found it easier to get a grasp of than Struts. The tools that become available for JSF are going to be the key to its dexterity and from what I have been reading, a lot of tools are on the way. In Part 2 of my JSF tutorial series I will demonstrate how to perform custom validation and we will look at how we can easily bind data to form elements like select lists.
Resources