There are two basic architectures for JavaServer Pages (JSP) development. The first is a page-centric design that
allows requests to be made directly to a JSP. The problem with this approach is that it will lead to JSPs with
excessive embedded Java code.
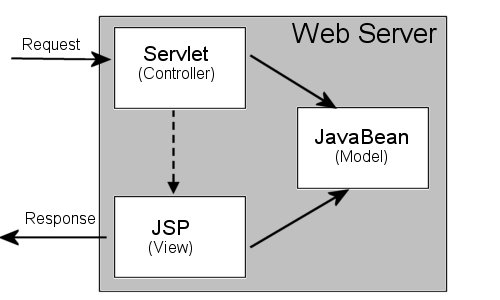
The second, a Model-View-Controller (MVC) architecture variant often called Model 2, is a controller design that
uses servlets to handle requests and JSPs to handle presentation. This allows for easy separation of function.
Although this is an improvement over the pure JSP model, this design is not without problems. If we code a separate
controller servlet for each page, we can end up with dozens of almost identical servlets. If we code a single controller
servlet, we end up with a monolithic class with a huge if/else statement that can be difficult to maintain. What's
needed to solve this problem is a controller architecture that can handle the repetitive details while still remaining
flexible and easy to maintain.
Figure: Model 2 architecture
Struts is an open source application framework that provides a flexible and easy to use controller architecture.
The nature of the framework helps to promote a Model 2 application architecture with clear separation of functionality.
Struts includes a controller servlet, JSP custom tag libraries, and utility classes.
Struts is being developed as part of the Jakarta project, sponsored by the Apache Software Foundation. Since it
is an open source project, it can be downloaded from http://jakarta.apache.org/struts
and used for free.
In this article I will explain the installation of Struts and discuss some of the basic functionality that it provides.
For purposes of this discussion, I will be working with Struts installed in Tomcat running on a Win32 platform.
To demonstrate some of the functionality of Struts we will code a simple logon function.
Struts provides the controller that will serve as the entry point for all requests into our application. The controller
determines which Java class will handle a particular request by referring to an XML file that contains mappings
of URL paths to Java classes. For a class to be usable by the Struts controller it must extend the Struts Action
class. Struts will call the perform( ) method of the Action object passing it the Servlet request and response
objects as well as some Struts objects which we will discuss in more detail later.
In addition, Struts can also be used to run a form pre-processor to do simple form validation. This is controlled
through the same XML file. We will also discuss this topic.
Struts also has custom JSP tag libraries that can simplify JSP programming. Besides special functionality used
in Struts programming, custom tags can provide commonly used functionality such as iterating through a collection.
Since the Apache Project includes the development of common custom tag libraries, the Struts tag libraries may
change in the future.
The installation of Struts is a relatively simple process. We will first create a directory structure in our Tomcat
installation that will allow us to create our test application. (In this example we are assuming that Tomcat has
been isntalled to a directory named c:\tomcat.) Under the webapps directory in the tomcat installation directory,
create a struts directory. Under that directory create two directories, jsp and WEB-INF. The
jsp directory will be used to hold the JSPs we
create for our application. Under the WEB-INF directory create two directories, classes and lib.
The lib directory will hold the struts.jar file. The classes directory will be used to hold
all the Java classes that we code. Under the classes directory, create a directory named test. Under
the test directory, create a directory called struts.
Now download the struts installation file. This is available as either a zip or tar file from the Struts homepage.
Uncompress the file. There are 20 files in this zip file but you do not need them all for your installation. Extract
all the files ending in .tld (there should be six of them) and copy them into the struts/WEB-INF
directory. Extract the struts.jar file and copy it into the struts/WEB-INF/lib directory. It must
be installed in the each application's lib directory. Note this warning from the Struts installation document:
WARNING - Do NOT add struts.jar to the classpath of your Servlet container in an attempt to avoid placing
it in the /WEB-INF/lib directory of each individual web app! Doing so will cause problems with ClassNotFoundException
exceptions.
So let me reiterate: You must place the struts.jar file in the "struts\WEB-INF\lib" directory. If you don't your application
will not work correctly. You will probably see this error: org.apache.jasper.JasperException: Missing message for key title.login
or you may see other errors.
You can also copy the struts.jar into the jre\lib\ext directory since you will need it to do compiles
of programs using Struts. You should also add the servlet.jar file to that directory if you haven't already
done it. You can find the servlet.jar file in the c:\tomcat\common\lib directory.
Once this has been completed, your directory structure and installed files (ignoring the other tomcat directories)
should look something like this:
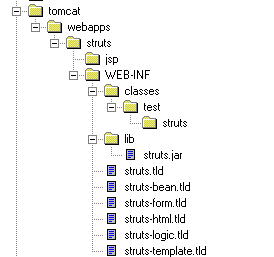
Figure: Directory structure of a Struts installation in Tomcat
There are two XML files that we, as Struts developers, will need to maintain. The first is the web.xml file
for our application. This file is stored in the application WEB-INF directory. An example web.xml
file is shown in Listing 1.
The first section of this file identifies the Struts controller class, ActionServlet and provides parameters for
this class. The "application" parameter identifies a properties file that contains error messages used
by the application. The "config" parameter identifies the Struts configuration file (more on this later).
The second section of the web.xml file tells Tomcat when to invoked the ActionServlet. In our example, ActionServlet
will be invoked whenever a URL ending with ".do" is found. For example, http://127.0.0.1/struts/login.do
will invoke the ActionServlet.
The final section identifies the Struts tag libraries.
Listing 2 shows a simple struts-config.xml file that is passed as a parameter
to the ActionServlet. It should be placed in the same directory as the web.xml file. The struts-config.xml
file can have several sections. The first section we will look at is the <action-mappings> section. <action>
tells Struts which class to invoke from the ActionServlet. Only the "path" and "type" are required
entries. The "type" tells Struts which Action class to invoke when a URL with the model of the "path"
is found. From the example in Listing 2, the URL http://127.0.0.1/struts/login.do
will cause the ActionServlet to run a method in the class "LoginAction".
The other tag inside the <action> tag is the <forward> tag. This tag gives a way to identify which
JSP should be given control by the Action class without coding it inside the class itself.
In order for a class to be entered in the <action-mappings> section and to be invoked by ActionServlet, it
must extend the class org.apache.struts.action.Action (see Listing 3). The ActionServlet
will execute the perform( ) method of the Action object. The perform method looks like this:
	public ActionForward perform(ActionMapping mapping, ActionForm form,
		HttpServletRequest request, HttpServletResponse response)
		throws java.io.IOException, javax.servlet.ServletException
The ActionMapping and ActionForm objects will contain information found in the struts-config.xml <action-mappings>
and <form-beans> sections. The HttpServletRequest and HttpServletResponse objects are from the servlet.
The perform( ) method must return an ActionForward object which will tell the ActionServlet which JSP gets control.
You can either:
We will use the method 2 since it will make it easier to change the JSP without changing the Java class.
Listing 3 is a simple Action class. It instantiates a validation bean which validates
that the user has rights to the system. In real life this might connect to a database using JDBC or connect to
an LDAP server using JNDI or make calls to an EJB servers. If the user does not have rights the bean returns an
ActionError object. The LoginAction class then routes the request to the correct JSP based on what the validation
bean returns.
If you wish to run this example, follow these steps:
Let's look at the main code of the perform( ) method:
First, we create our bean to validate the login information and make that bean available to our JSPs. We then pass the HttpServletRequest object to the validation bean so that it can extract the fields it needs to validate.
		LoginBean lb = new LoginBean( );
		request.setAttribute("LoginBean", lb);
		lb.setParameters(request);
We then call the validation bean to validate the information from the form returning to us an ActionErrors object. ActionErrors is a collection object that can hold ActionError objects. In a moment we will see why we use ActionErrors to report errors. We then add the ActionErrors object to the HttpServletRequest object to make it available to our JSPs. The key we use (Action.ERROR_KEY) is a standard key for ActionErrors objects in Struts.
		ActionErrors ae = lb.validate( );
		request.setAttribute(Action.ERROR_KEY, ae);
Finally, we look at the ActionErrors object that was returned to us and if it is null or empty (either of these can signify no errors in Struts) we forward to the main menu JSP. If the ActionErrors object contains an ActionError, we pass control to the Login JSP.
		if (ae == null || ae.size( ) == 0) {
			return mapping.findForward("valid");
		} else {
			return mapping.findForward("invalid");
		}
If the LoginBean finds an invalid login was attempted, it executes the following code:
	ActionErrors ae = new ActionErrors( );
	ae.add("userId", new ActionError("error.invalid.login"));
	return ae;
First it creates an ActionErrors object to hold the ActionError object it is about to create. Next, it creates
the ActionError object passing a String to the constructor. The String is a key from the MessageResources.properties
file (Listing 5). Then it adds the ActionError object to the ActionErrors collection
giving it a String representing which particular field is causing the problem.
But why go to all this trouble to create ActionError objects in the first place? The reason has to do with the
JSP. If we look at the LoginView.jsp we find this line:
<html:errors />
This tag will extract the information from the ActionErrors object and display all the errors neatly on the form (see Figure 3). The tag will use standard keys from the MessageResources file to display a header and footer around the error mesages. See the errors.header, errors.footer and error.invalid.login from the MessageResources.properties (Listing 5).
You can also use <html:errors property="userId" /> to display a particular message based
on the key used when it was added to the ActionErrors object. This is useful if you want to display the message
next to the field causing the error.
If you look at LoginView.jsp, you will see that there are numerous references to the Struts tag libraries. For
example:
	<struts:message key="heading.login" />
	<html:form action="/login">
	<html:text property="userId" size="10" />
	<html:password property="passWord" size="10" />
	<html:submit>
		<bean:message key="button.submit" />
	</html:submit>
Each of these can simplify the use of Struts, the writing of your JSP, and the internationalization of your
application.
struts:message will replace this tag with the matching text found in the MessageResources file. This can
simplify internationalization issues.
html:form will define the form tag with the listed action. The action is specified by using the path from
the struts-config.xml file. It will be replaced with the correct form (/login.do) before it is sent to the
client. The html:form tag will also populate the input fields with the current property values from the bean associated
with this form.
html:text and html:password will create either a text field or password field and populate it with
the specified property from the bean associated with this form.
html:submit will generate a submit button for the form. We can use a struts:message inside the html:submit
tag in order to specify the label on the button.
There are tags within Struts that allow you to create radio buttons, check boxes, and other form objects.
We have seen how the Struts architecture works and developed a simple Struts application. The one major piece we
have not looked at is the ActionForm class which provides a simple way to do basic form validation.
In most applications there are some basic validations that need to be done on data from a form. This may include
insuring that required fields are entered, that dates are in a valid format, that numeric fields contain numerics,
etc. Struts provides a simple mechanism using form beans to provide this level of validation. Form beans (any class
that extends ActionForm) should not connect to a database or provide complex validations.
Form beans will be given control by Struts before the Action class. If the form bean determines that the form is
invalid it should return an ActionErrors object containing an ActionError object for each error found. Struts will
then return the input JSP back to the user with the errors displayed on the form. The Action class will not be
invoked unless an empty ActionErrors object or a null is returned.
Listing 4 displays a sample form bean. A form bean must extend ActionForm and should
have a get and set method for each field on the form. Struts will run the validate( ) method of the form bean.
The validate( ) method looks like this:
public ActionErrors validate(ActionMapping mapping,
		HttpServletRequest request) {

	ActionErrors ae = new ActionErrors( );

	if (userId == null || userId.equals("")) {
		ae.add("userId", new ActionError("error.no.userId"));
	}

	if (passWord == null || passWord.equals("")) {
  		ae.add("passWord", new ActionError("error.no.passWord"));
	}

	return ae;
}
The code itself is fairly simple and should be familiar from the LoginBean.
To activate this form bean we need to add a few entries to the struts-config.xml file. Listing
2a shows the revised file. First we need to add a defintion for the bean itself:
  <form-beans>
  	<form-bean name="login" type="test.struts.LoginForm" />
  </form-beans>
Next we turn on validation for the login and define the input form. The input form is used by Struts to determine
which JSP to give control to when the form bean returns ActionErrors:
  <action
    	path="/login"
    	type="test.struts.LoginAction"
    	name="login"
    	input="/jsp/LoginView.jsp"
    	validate="true">

	    <forward name="valid" path="/jsp/MainMenu.jsp" />
	    <forward name="invalid" path="/jsp/LoginView.jsp" />
	</action>
Now whenever the login is attempted, LoginForm will run and validate that the required fields are entered before control is passed LoginAction. If the fields are not entered then the form will be redisplayed and LoginAction will not run. Figure 3 shows the output of a failed login attempt.
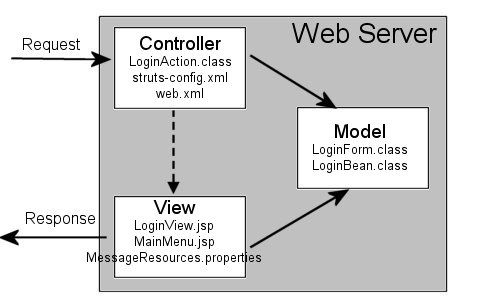
Figure: MVC architecture with example classes
That is a brief look at the basics of Struts. There is much more to Struts and the custom tag libraries contain a lot more functionality than we have touched upon in this article. I recommend that anyone doing servlet/JSP/EJB development take a look at Struts. Even if you choose not to use it, I think it will give you some good ideas about the proper way to build a Model 2 architecture.
Meanwhile, Struts development continues. The Struts custom tag libraries are being merged with the JSP Standard Tag Library (JSTL). Struts for Transforming XML with XSL (stxx) is available. To keep up-to-date with what is going on in Struts and to find out how others are using Struts, you can subscribe to the STRUTS-USER mailing list.